REHABILITATION PROTOCOL FOR ROTATOR CUFF REPAIR
POSTOPERATIVE INSTRUCTIONS
Anastasios Papadonikolakis, MD, PhD
PERIOD 1: First to 7 days after surgery
GOALS:
1. Protect the repaired tendons of the rotator cuff
2. Begin early shoulder motion
What to do:
After the operation
1. After surgery you will be taken to the post anesthesia care unit where the nurses will evaluate you and make sure that your pain is under control. The arm will be immobilized in a sling.
2. After you go home or to your hospital room you should get out of bed and move around as much as you can but with assistance the first day of surgery. Sit on the side of the bed before you start walking to avoid losing your balance and having a fall
3. Elevate with a pillow your hand with a pillow under the arm. Move your fingers and wrist to avoid swelling
4. Apply cold packs to the operated shoulder to reduce pain and swelling. Make sure that the ice does not come in contact with the skin (we suggest wrapping the ice in a towel)
5. You can remove your sling while keeping your elbow touching to your belly (no shoulder motion) and move your fingers, hand and elbow to increase circulation.
6. You will receive a prescription for pain medication for when you go home (it will make you
constipated if you take it for a long time). Make sure you drink 2-3 liters of water daily and that you take the stool softener as well.
Day 1 after the surgery
1. The large dressing can be removed and a small bandage applied.
2. Remove the sling several times a day to gently move the arm in a pendulum motion: lean
forward and passively swing the arm.
What you can do at home
1. Please remove the bandages. Leave the small pieces of tape (steristrips) in place.
2. You may shower and get the incision wet. To wash under the operated arm, bend over at the
waist and let the arm passively come away from the body. It is safe to wash under the arm in
this position. This is the same position as the pendulum exercise. DO NOT TAKE BATHS
3. Apply cold to the shoulder for 20 minutes at a time as needed to reduce pain and swelling.
4. Remove the sling several times a day: move the elbow wrist and hand. Lean over and do
pendulum exercises for 3 to 5 minutes every 1 to 2 hours.
5. DO NOT lift your arm at the shoulder using your muscles.
6. Because of the need for your comfort and the protection of the repaired tendon, a sling is
usually necessary for 4 to 6 weeks, unless otherwise instructed by your surgeon.
When to see the doctor:
Please arrange to see your surgeon in the office 3-10 days after surgery for suture removal and
further instructions. If you have questions or concerns regarding your surgery or the rehabilitation
protocol and exercises call the office.
Rehabilitation after Rotator Cuff Repair
Phase One: 0 to 6 weeks after surgery
Goals:
1. Protect the rotator cuff repair
2. Ensure wound healing
3. Prevent shoulder stiffness
4. Regain range of motion
Activities:
1. Sling
Use your sling most of the time. Remove the sling 4 or 5 times a day to
do pendulum exercises.
2. Use of the affected arm
You may use your hand on the affected arm in front of your body but DO
NOT raise your arm or elbow away from your body. It is all right for you
to flex your arm at the elbow. Also:
-No Lifting of Objects. Nothing heavier than a cup of coffee.
-No Excessive Shoulder Extension
-No Excessive Stretching or Sudden Movements
-No Supporting of Body Weight by Hands
3. Showering
You may shower or bath and wash the incision area. To wash under the
affected arm, bend over at the waist and let the arm passively come away
from the body. It is safe to wash under the arm in this position. This is
the same position as the pendulum exercise.
Exercise Program
ICE
Days per Week: 7 As necessary 15- 20 minutes
Times per Day: 4-5
STRETCHING / PASSIVE MOTION
Days per Week: 7 Times per day: 4-5
Program:
Pendulum exercises
Supine External Rotation
Supine passive arm elevation
Scapular retraction
Shoulder shrug
Ball squeeze exercise
Starting at 3rd week after surgery:
Behind the back internal rotation
PERIOD 2: 6 to 12 weeks after surgery
Goals:
1. Protect the rotator cuff repair
2. Improve range of motion of the shoulder
3. Begin gentle strengthening
Activities
1. Sling
Your sling is no longer necessary unless your doctor instructs you to continue using it.
2. Use of the operated arm
You should continue to avoid lifting your arm away from your body, since this is the
action of the tendon that was repaired. You can lift your arm forward in front of your
body but not to the side. You may raise your arm to the side, if you use the good arm to
assist the operated arm.
3. Bathing and showering
Continue to follow the instructions from phase one and the instructions above.
Exercise Program
The exercises listed below may be gradually integrated into the rehabilitation program
under the supervision of your doctor and/or physical therapist.
STRETCHING / ACTIVE MOTION
Days per week: 5-7
Stretching
Times per day: 1-3
Pendulum exercises
Supine External Rotation
Standing External Rotation
Supine passive arm elevation
Active-Assisted Arm Elevation
Behind the back internal rotation
Supine external Rotation with Abduction
External rotation @ 90o abduction
Supine Cross-Chest Stretch
Wall slide Stretch
Overhead pullies
Active Motion
Side-lying External Rotation
Prone Horizontal Arm Raises “T”
Prone row
Prone scaption “Y”
Prone extension
Active-assisted Arm Elevation
progressing to:
Standing Forward Flexion (scaption)
with scapulohumeral rhythm
Resisted forearm supination-pronation
Resisted wrist flexion-extension
Sub-maximimal isometric exercises:
internal and external rotation at neutral
with physical therapist
Rhythmic stabilization and
proprioceptive training drills with
physical therapist
Phase 3: 12-18 weeks after surgery
Goals:
-
Protect the rotator cuff repair
-
Regain full range of motion
-
Continue gentle strengthening
Activities:
Use of the operated arm
You may now safely use the arm for normal daily activities involved with dressing,
bathing and self-care. You may raise the arm away from the body; however, you should
not raise the arm when carrying objects greater than one pound. Any forceful pushing or
pulling activities could disrupt the healing of your surgical repair.
Exercise Program
The exercises below form a list that may be gradually integrated into the rehabilitation
program under the supervision of your doctor and/or physical therapist. Resistance for
the dynamic strengthening exercises can gradually be added starting with 1 lb and should
not exceed 3 lb at this time.
STRETCHING / ACTIVE MOTION / STRENGTHENING
Days per week: 3
Stretching
Times per day: 1
Pendulum exercises
Supine external Rotation
Standing external Rotation
Supine passive arm elevation
Behind the back internal rotation
Hands-behind-the-head stretch
Supine cross-chest stretch
Sidelying internal rotation stretch
External rotation at 90° abduction
stretch
Wall slide Stretch
Theraband Strengthening
External Rotation
Internal Rotation
Standing Forward Punch
Shoulder Shrug
Dynamic hug
“W”’s
Seated Row
Biceps curl
Dynamic Strengthening
Side-lying External Rotation
Prone Horizontal Arm Raises “T”
Prone scaption “Y”
Prone row
Prone extension
Scapulohumeral rhythm exercises
Standing forward flexion (scaption)
PNF manual resistance with physical
therapist
Propriocetion drills
Phase 4: 18 to 26 weeks after surgery
Goals:
1. Continue to protect the repair by avoiding excessive forceful use of the arm or lifting
excessively heavy weights.
2. Restore full shoulder motion
3. Restore full shoulder strength
4. Gradually begin to return to normal activity
Activities:
1. Sports that involve throwing and the use of the arm in the overhead position are the
most demanding on the rotator cuff. Your doctor and sports physical therapist will
provide you with specific instructions on how and when to return to golf, tennis, and
volleyball, swimming and throwing.
2. For people who wish to return to training with weights, you’re your doctor will give
you guidelines regarding the timing and advice when returning to a weight-training
program.
3. The following timetable can be considered as a minimum for return to most activities:
Ski
Golf
Weight Training
Tennis
Swimming
Throwing
6 -8 months
Before returning safely to your activity, you must have full range of motion, full strength
and no swelling or pain.
Your doctor or physical therapist will provide you with a specific interval-training
program to follow when it is time to return the above activities.
STRETCHING / ACTIVE MOTION / STRENGTHENING
Days per week: 3
Times per day: 1
Stretching
Behind the back internal rotation
Standing External Rotation / Doorway
Wall slide Stretch
Hands-behind-head stretch
Supine Cross-Chest Stretch
Sidelying internal rotation (sleeper stretch)
External rotation at 90° Abduction stretch
Theraband Strengthening
External Rotation
Internal Rotation
Standing Forward Punch
Shoulder Shrug
Dynamic hug
“W”’s
Optional for Overhead Sports:
External rotation at 90°
Internal rotation at 90°
Standing ‘T’s
Diagonal up
Diagonal down
Dynamic Strengthening
It is recommended that these exercises be limited to resistance not to exceed 5lb.
Side-lying External Rotation
Prone Horizontal Arm Raises “T”
Prone scaption “Y”
Prone row
Prone extension
Standing Forward Flexion
Standing forward flexion “full-can” exercise
Prone external rotation at 90° abduction “U’s
Push-up progression
Plyometric Exercises
Your doctor or physical therapist will provide you with a specific plyometric-training
program to follow when appropriate.
Weight Training
See weight training precautions
Illustrations
The exercises illustrated and described in this document should be performed only after
instruction by your physical therapist or doctor.
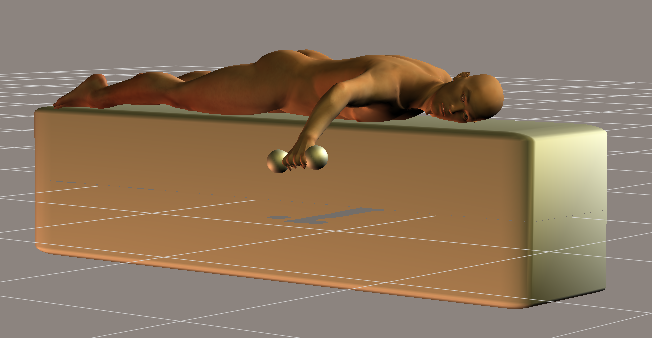
Pendulum exercise
Bend over at the waist and let the arm hang down. Using your body to
initiate movement, swing the arm gently forward and backward and in a
circular motion.
Shoulder shrug
Shrug shoulders upward as illustrated.
Shoulder blade pinches
Pinch shoulder blades backward and together, as illustrated.
Supine passive arm elevation
Lie on your back. Hold the affected arm at the wrist with the opposite
hand. Using the strength of the opposite arm, lift the affected arm upward,
as if to bring the arm overhead, slowly lower the arm back to the bed.
Supine external rotation
Lie on your back. Keep the elbow of the affected arm
against your side with the elbow bent at 90 degrees.
Using a cane or long stick in the opposite hand, push
against the hand of the affected arm so that the affected
arm rotates outward. Hold 10 seconds, relax and repeat.
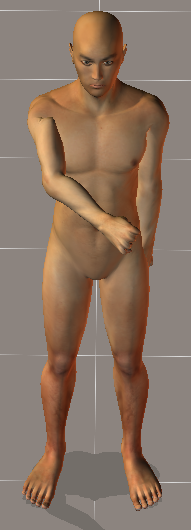
Behind-the-back internal rotation
Sitting in a chair or standing, place the hand of the
operated arm behind your back at the waistline. Use
your opposite hand, as illustrated, to help the other
hand higher toward the shoulder blade. Hold 10
seconds, relax and repeat.
Supine cross-chest stretch
Lying on your back, hold the elbow
of the operated arm with the opposite
hand. Gently stretch the elbow toward
the opposite shoulder. Hold for 10
seconds.
Sidelying internal rotation stretch
Lie on your side with the arm positioned so that the arm
is at a right angle to the body and the elbow bent at a 90o
angle. Keeping the elbow at a right angle, rotate the arm
forward as if to touch the thumb to the table. Apply a
gentle stretch with the opposite arm. Hold 10 to 15
seconds.
External rotation at 90o abduction stretch
Lie on your back. Support the upper arm, if needed, with
towels or a small pillow. Keep arm at 90 degrees to the
body and the elbow bent at 90 degrees. Using a stick
and the opposite arm, stretch as if to bring the thumb to
the corner of the table adjacent to your ear. Hold for
10 seconds, and then return to the starting position
Wall slide stretch
Stand facing a wall; place the hands of both arms on the wall. Slide the
hands and arms upward. As you are able to stretch the hand and arm
higher, you should move your body closer to the wall. Hold 10 seconds,
lower the arm by pressing the hand into the wall and letting it slide slowly
down.


Seated/Standing Forward Elevation (Overhead Elbow Lift)
During this phase, you can stand or sit in a chair. If it is easier,
begin lying on your back until you achieve maximal motion,
then use the standing or seated position. Assume an upright
position with erect posture, looking straight ahead. Place your
hands on either thigh with the operated thumb facing up and
your elbow straight. In the beginning, this stretch is not
performed solely with the operated arm, but uses the uninjured
hand for assistance going up and coming down. As you become
stronger, you can raise and lower your arm without assistance.
The operated arm should be lifted as high as possible, or to your
end-point of pain. Try to raise the arm by hinging at the shoulder
as opposed to raising the arm with the shoulder blade.


Standing forward flexion
Stand facing a mirror with the hands rotated so that the
thumbs face forward. Raise the arm upward keeping the
elbow straight. Try to raise the arm by hinging at the shoulder
as opposed to raising the arm with the shoulder blade. Do
10 repetitions to 90 degrees. If you can do this without
hiking the shoulder blade, do 10 repetitions fully overhead.
Isometric internal and external rotation
Stand facing a doorjamb or the corner of a wall.
Keep the elbow tight against your side and hold the
forearm at a right angle to the arm. For internal rotation,
place the palm against the wall with the thumb facing
up. For external rotation, place the back of the hand
against the wall with the thumb facing up.
Pull or push against the wall and hold for 5 seconds
Ball squeeze exercises
Holding a rubber ball or tennis ball, squeeze the ball and hold for 5
seconds
Prone rowing
The starting position for this exercise is to bend over at the waist
so that the affected arm is hanging freely straight down.
Alternatively, lie face down on your bed with the operated arm
hanging freely off of the side. While keeping the shoulder blade ‘set’, raise the arm up toward the ceiling while bending at
the elbow. The elbow should be drawn along the side of the body
until the hands touch the lower ribs. Always return slowly to the start position.


Prone horizontal abduction (‘T’s)
The starting position for this exercise is to bend over at the waist so that
the affected arm is hanging freely straight down. Alternatively, lie face
down on your bed with the operated arm hanging freely off of the side.
Rotate your hand so that the thumb faces forward. While keeping the
shoulder blade ‘set’ and keeping the elbows straight, slowly raise your arm
away from your body to shoulder height, through a pain-free range of
motion (so that your hand now has the thumb facing forward, and aligned
with your cheek). Hold that position for 1 to 2 seconds and slowly lower.
Limit the height that you raise the arm to 90 degrees, or in other words,
horizontal to the floor.


Prone horizontal abduction with external rotation
The starting position for this exercise is to bend over at the waist so that
the affected arm is hanging freely straight down. Alternatively, lie face
down on your bed with the operated arm hanging freely off of the side.
Rotate your hand so that the thumb faces outward. While keeping the
shoulder blade ‘set’ and keeping the elbows straight, slowly raise your arm
away from your body to shoulder height, through a pain-free range of
motion (so that your hand now has the thumb facing forward, and aligned
with your cheek). Hold that position for 1 to 2 seconds and slowly lower.
Limit the height that you raise the arm to 90 degrees, or in other words,
horizontal to the floor.
Prone scaption (‘Y’s)
The starting position for this exercise is to bend over
at the waist so that the affected arm is hanging freely
straight down.
Alternatively, lie face down on your bed with the operated
arm hanging freely off of the side. Keep the shoulder blade
‘set’ and keep the elbows straight. Slowly raise the arm
away from your body and slightly forward through a
pain-free range of motion (so that your hand now has the
thumb facing up, and is aligned with your forehead). Hold that position for 1 to 2 seconds and slowly lower.
Limit the height that you raise the arm to 90 degrees,or in other words, horizontal to the floor.

Prone extension
The starting position for this exercise is to bend over at the
waist so that the affected arm is hanging freely straight down.
Alternatively, lie face down on your bed with the operated arm
hanging freely off of the side. While keeping the shoulder blade
‘set’ and keeping the elbow straight, raise the arm backward
toward your hip with the thumb pointing outward. Do not lift
your hand past the level of your hip.
Prone external rotation at 90 o Abduction
Lie face down on a table with your arm hanging over
the side of the table. Raise the arm to shoulder height
at a 90o angle to the body. While holding the arm in
this position, rotate the hand upward, until the hand is
even with the elbow. Hold one second and slowly let
the hand rotate to the starting position and repeat.
Sidelying external rotation
Lying on the non-operated side, bend your elbow to a 90-degree
angle and keep the operated arm firmly against your side with your
hand resting on your abdomen. By rotation at the shoulder, raise
your hand upward, toward the ceiling through a comfortable range
of motion. Hold this position for 1 to 2 seconds, and then slowly
lower the hand.
Standing forward flexion (‘full-can’) exercise
Stand facing a mirror with the hands rotated so that the
thumbs face forward. While keeping the shoulder blade
‘set’ and keeping the elbows straight, raise the arms
forward and upward to shoulder level with a slight
outward angle (30°). Pause for one second and slowly
lower and repeat.
Lateral Raises
Stand with the arm at your side with the elbow straight
and the hands rotated so that the thumbs face forward.
Raise the arm straight out to the side, palm down, until
the hands reach shoulder level. Do not raise the hands
higher than the shoulder. Pause and slowly lower the arm.
Theraband Strengthening
These resistance exercises should be done very slowly in both directions.
We want to strengthen you throughout the full range of motion and it is
very important that these exercises be done very slowly, not only when
you complete the exercise (concentric), but also as you come back to the
start position (eccentric). The slower the motion, the more maximal the
contraction throughout a full range of motion.
External Rotation
Attach the theraband at waist level in a doorjamb or other.
While standing sideways to the door and looking straight
ahead, grasp one end of the band and pull the band all the way through until it is taut. Feet are shoulder width
apart and the knees are slightly flexed. The elbow is
placed next to the side with the hand as close to your chest as possible (think of this elbow as being a
hinge on a gate). Taking the cord in the hand, move the
hand away from the body as far as it feels comfortable.
Return to the start position.


Internal Rotation
Attach the Theraband at waist level in a doorjamb or other.
While standing sideways to the door and looking straight
ahead, grasp one end of the handle and pull the cord all the way through until it is taut. Feet are shoulder width
apart and the knees are slightly flexed. The elbow is placed
next to the side and is flexed at 90 degrees (think of this
elbow as being a hinge on a gate). Taking the cord in the hand, move the hand toward the chest as far as it feels comfortable. Return to the start position.
Shoulder Shrug
Stand on the theraband with your feet at should width
apart and look straight ahead. Next, straighten up,
keeping the knees slightly flexed, with your arms
straight down at the sides (palms in). Slowly raise
the shoulders in a shrug (toward the ears), then rotate
the shoulders backward in a circular motion, and
finally down to the original position. This movement is completed while keeping constant tension on the cord.
Seated / Standing Row
Attach the theraband in a doorjamb or other. Sit or stand
facing the door. Use a wide flat—footed stance and keep
your back straight. Begin with the arms slightly flexed, hands together at waist level in front of your
body, thumbs pointing upward, and with the cord taut. You are producing a rowing motion. Pull the cord
all the way toward the chest. While pulling the cord, the elbows should be drawn along the side of the body
until the hands touch the lower ribs. Always return
slowly to the start position.


Standing Forward Punch
Attach the theraband at waist level in the doorjamb.
Facing away from the door, stand in a boxing position
with one leg ahead of the other (stride position). Do not
bend at the waist and remain in an upright position. If the right shoulder is the injured extremity, you will
want to grasp the handle in the right hand and step out until the cord is taut. If you use the right hand, the left foot should be forward in the stride position.
Begin with your right arm at waist level and bend the
elbow at a 90 degree angle, with the elbow remaining
near your side. Slowly punch forward while slightly
raising the right arm in a forward, upward punching
motion. The hand should reach approximately neck
level with the right arm almost straight.
Biceps Curls
Place your feet on the cord, shoulder width apart,
knees slightly bent. Keeping your elbows close to
the sides of your body, slowly bend the arm at the
elbow and curl towards the shoulder.
Dynamic Hug
With the tubing attach behind you at shoulder height,
grip both ends of the tubing in your hands with the
tubing on the outside of your shoulders. Pull the
band forward and slightly downward in a ‘hugging’
motion, or as if you were wrapping both arm around
a small tree. Pause and return slowly to the starting
position.
‘W’s
With the tubing attached in front of you,
stand with the tubing in both hands with the elbows bent at 90o and fixed at your side.
Pull the band outward, keeping the elbow at
your side. The arms rotate outward making
the shape of a ‘W’.
Standing ‘T’s.
Stand with the theraband attached in front of you. Stand with the arm flexed forward at shoulder height with the elbow straight. While keeping the elbow straight, pull the arm toward the rear until the arm is by your side.
Theraband external rotation at 90o.
Stand with the theraband attached in front of you.
Keeping the arm elevated to 90 degrees and the
elbow at a 90-degree angle, rotate the hand and
arm slowly backward and then return slowly to the
start position.
Theraband internal rotation at 90o.
Stand with the theraband attached behind you.
Keeping the arm elevated to 90 degrees and the
elbow at a 90-degree angle, rotate the hand and
arm slowly forward and then return slowly to the
start position.
Theraband diagonal-up
Stand with the theraband attached on your left side for
your right hand. Start with your right hand on the left hip
with the thumb facing the hip. Start by pulling the band
so that your hand travels up and behind your head.
Theraband diagonal-down
Stand with the theraband attached behind you at shoulder
level. Start with your arm in throwing position. Pull the
band down and across your body so that your thumb faces
the opposite hip.