Wednesday, February 15, 2017

Dislocation of reverse shoulder replacement. Can we always identify the reason?

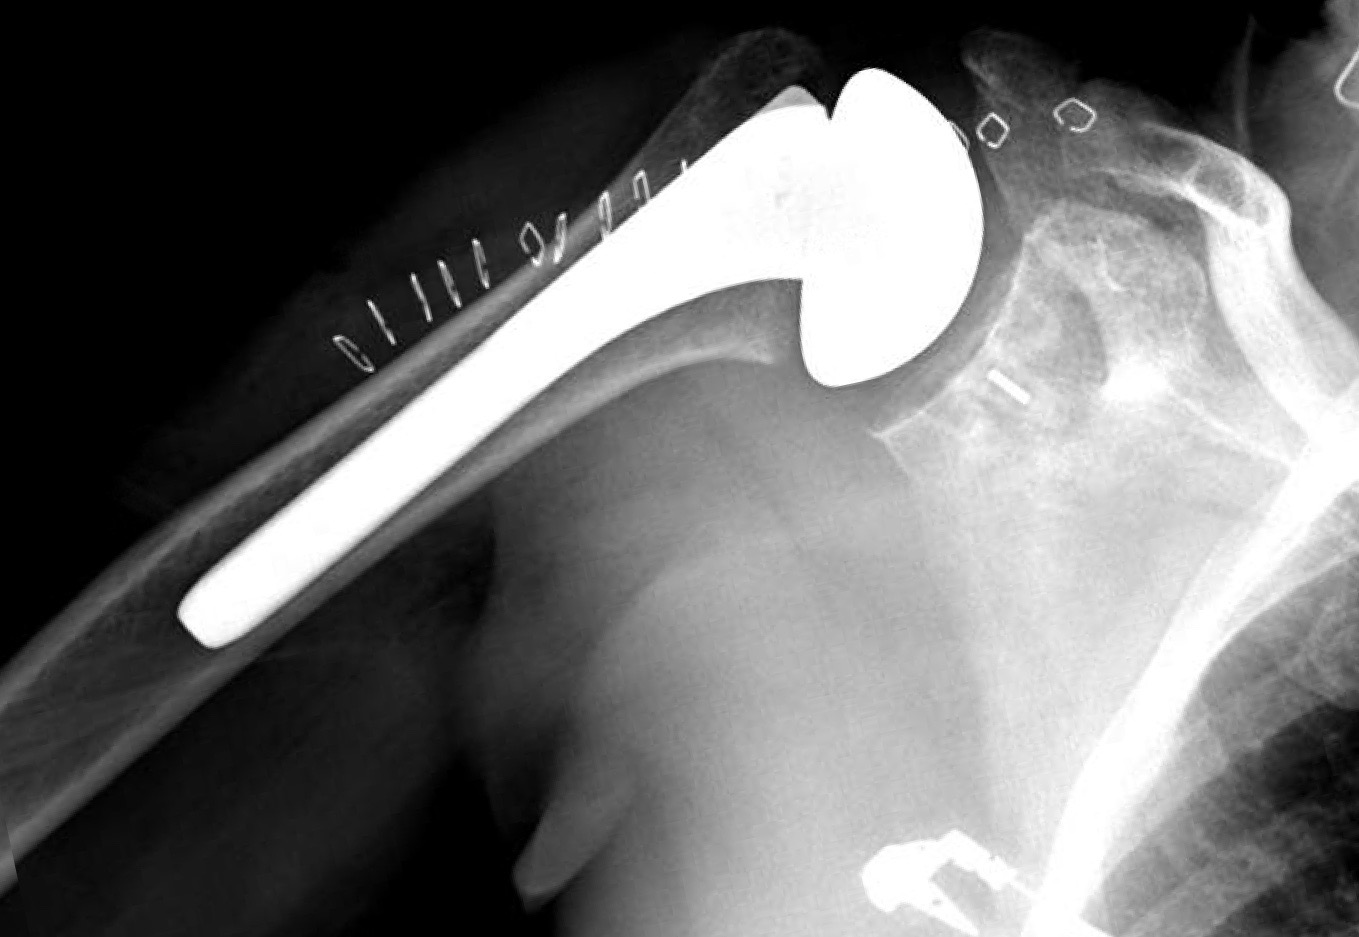
This case illustrates an early dislocation of a reverse total shoulder replacement (rTSA). The procedure was done for severe rotator cuff arthropathy with very limited preoperative active motion. In fact the active forward elevation was 10 to 20 degrees. During surgery an insitu humeral cut was required to achieve shoulder dislocation due to significant stiffness and difficulty in dislocating the shoulder for the humeral cut. After a successful rTSA and at 3 weeks postoperatively, the patient was found to have an anterior dislocation but reported no pain. Interestingly, he had no idea that the shoulder was dislocated. It was found dislocated at a routine follow up visit. Closed reduction was unsuccessful, and for that reason the patient was taken to the operating room for revision. A revision was performed to a thicker polyethylene which made the prosthesis stable intra-operatively at the extremes of ROM. In addition, no impingement was seen intra-operatively. Two weeks later he dislocated again in an anterior direction and again the patient was pain FREE.


Preoperative images are seen above


First dislocation is seen above 3 weeks after index procedure


Revision to thicker polyethylene provided stability for a short period of time (2 weeks)


At two weeks after the revision to a thicker polyethylene the shoulder was dislocated anteriorly and interestingly the patient

1. was not aware of when or how this happened
2. had NO PAIN.

During the past 7 years of my shoulder practice I have used the reverse TSA to solve complex problems of failed prior shoulder operations and never had a dislocation. I am not sure I understand the exact reason of this failure. An attempt is made below to identify the cause.


Identifiable reasons for dislocations are:

1. Male gender
2. Infection
3. Non compliance with restrictions in activity
4. Trauma
5. Prior shoulder surgery with an unstable prior arthroplasty - greatest risk
6. Soft tissue imbalance
7. Implant design
8. Scapular notching
9. Subscapularis release and choice of no repair back to humerus
10. Impingement to bony structures or soft tissue
11. High BMI
12. Component malpositioning
13. Abutment of the medial aspect of the humeral cup against the scapular neck causing the humeral component lever away from glenosphere.
14. Loose soft tissue tensioning.

From those factors only number 1, 3, 7  can be considered in this case as the revision surgery and evaluation of the shoulder intra-operatively eliminated the other factors.

In the Australian registry 2016 (Data Period 1 September 1999 – 31 December 2015) the proportion of rTSA has increased from 43.7% in 2010 to 64.1% in 2015. In the same registry the majority of revisions of reverse total shoulder replacements were done for dislocation or instability. However, it is not mentioned how many of those remained stable. In general the rate of revision after rTSA is 3-10% for instability or dislocation and it is the most common complication in the majority of published series of rTSA. In the Australian registry instability or dislocation accounts for 38% of all revisions.


Some implant designs are prone to high chances of impingement as seen below, as the humerus or polyethylene is in close proximity with the glenoid.


Bottomline is we are still learning about the reverse total shoulder prosthesis and there is a lot of space for improvement in the design and patient selection process.

While initially the patient elected to avoid a 3rd operation, later on during the course of his treatment he decided to proceed with conversion to a hemi-arthoplasty. Pictures below show that his scapula is superiorly tilted. This scapula position, is different compared to superior glenoid wear which is seen in rotator cuff arthropathy. Correction of this scapula alignment with over-reaming inferiorly could have been a possible solution, however the eccentric glenoid reaming and removal of glenoid bone  inferiorly would be have extensive and thus weakening the fixation and of glenosphere to the glenoid .

The films after the conversion to hemi-arthroplasty are seen below:


Sunday, February 12, 2017

Is it time for hybrid polyethylene and metallic cage pegged glenoid components?

There are implant companies that promote hybrid - "metallic cage" pegged polyethylene glenoid components. This is not a new concept. Several companies have introduced glenoid components in the past that have metal pegs in an attempt to solve the problem of radiolucent lines around the glenoid peg holes which in some series can reach a frequency of 70% on initial radiographs. The concern with the cage or metallic cage pegs, is that the junction of the polyethylene to the metallic peg will see extensive stress during the edge loading of the glenoid rim from the humerus. The plastic deformation of the polyethylene is advantageous for the shoulder joint. In this new design the concern is that these "new" hybrid polyethylene components may fail the same way that the metal back glenoid components fail. Dissociation is a true concern. We need to have 5 year data to decide whether this is the case. In the meantime, I continue to use all poly cemented pegged glenoid components such as the one seen on X-rays below:


Tuesday, January 17, 2017

Neer Award 2017: A rapid method for detecting Propionibacterium acnes in surgical biopsy specimens from the shoulder


Background: Propionibacterium (P) acnes infection of the shoulder after arthroplasty is a common and serious complication. Current detection methods for P acnes involve anaerobic cultures that require pro- longed incubation periods (typically 7-14 days). We have developed a polymerase chain reaction (PCR)- restriction fragment length polymorphism (RFLP) approach that sensitively and specifically identifies P acnes in tissue specimens within a 24-hour period.
Methods: Primers were designed to amplify a unique region of the 16S rRNA gene in P acnes that con- tained a unique HaeIII restriction enzyme site. PCR and RFLP analyses were optimized to detect P acnes DNA in in vitro cultures and in arthroscopic surgical biopsy specimens from patients with P acnes infections. 
Results: A564base-pairPCRampliconwasderivedfromalloftheknownPacnesstrains.HaeIIIdigests of the amplicon yielded a restriction fragment pattern that was unique to P acnes. P acnes-specific amplicons were detected in as few as 10 bacterial cells and in clinical biopsy specimens of infected shoulder tissues. 
Conclusion: This PCR-RFLP assay combines the sensitivity of PCR with the specificity of RFLP mapping to identify P acnes in surgical isolates. The assay is robust and rapid, and a P acnes-positive tissue specimen can be confirmed within 24 hours of sampling, facilitating treatment decision making, targeted antibiotic therapy, and monitoring to minimize implant failure and revision surgery.
Level of evidence: Basic Science Study; Microbiologic Laboratory Study
© 2016 Journal of Shoulder and Elbow Surgery Board of Trustees. All rights reserved.


Comment: this is a significant contribution, the sample costs 5 dollars and it simplifies the process of diagnosis a low grade infection which most of the time is in "stealth mode" and it is difficult to diagnose. The protocol I follow when I suspect a p acnes infection is that I do a one stage exchange of the components, i do not remove well fixed components, I do extensive debridement and I prescribe oral Augmentin 875 mg BID for 14 days until the cultures are finalized. This window of antibiotic treatment with Augmentin can be eliminated with the use of this test. Below is an example of a different application for the diagnosis of pseudomonas.


The authors of the p acnes paper state:

"A major strength of PCR-RFLP assay described in this report is its specificity for P acnes. This specificity is predicted to be greater than routine culture-based approaches and previously published PCR approaches, because it has 2 levels of verification. The first level is PCR amplification with P acnes-specific primers, and the second is a P acnes-specific RFLP pattern. Previous reports had the first (albeit less specific than ours), but not the second. The strength of this extremely sensitive technology is the ability to detect fewer than 10 P acnes cells in the sample. The weakness is that this level of sensitivity makes aseptic sample collection very important. PCR and RFLP mapping are techniques that are routinely performed in many clinical microbiology and pathology laboratories, and so this approach is not restricted to highly specialized research laboratories."

Friday, January 13, 2017

Revision of failed cemented hemiarthroplasty to a reverse total shoulder replacement

Failure of healing of the tuberosities is considered a frequent cause of poor outcome after hemi-arthroplasty for proximal humerus fracture. Cemented hemi-arthroplasties that have failed to provide adequate pain relief or function to the shoulder are very challenging problems. Most of the time the patient is an elderly person, there might be associated osteopenia, and the active shoulder range of motion is limited. The following case is an example of the challenges that a surgeon is facing in the treatment of this complex problem.

This patient underwent 3 shoulder surgeries prior to referral to us.  The primary press fit hemi-arthroplasty for the proximal humerus fracture was the first surgery which was revised to a cemented hemi-arthroplasty due to loss of the version of the press fit prosthesis. The 3rd operation was done as an attempt to revise to a reverse shoulder replacement and a vascular injury resulted in abandoning the surgery. Subsequently the patient was referred to us for treatment. She had constant pain and very limited active forward flexion of the shoulder.

Below are the preoperative Grashey X-ray of the shoulder which demonstrates a high riding humeral head and prosthesis, failure of healing of the tuberosities, no signs of loosening of the implant, and thin cortices at the metaphyseal area of the proximal humerus. A CT scan shows good bone stock and no cavitation of the glenoid.


Revision to a reverse shoulder replacement was considered in this case as there was enough glenoid bone stock and the patient was older than 70 years of age. The main challenges of this surgery are outlined below:

1. Prior axillary artery repair, increase risk of repeat vascular injury as there is an altered surgical field from 3 prior surgeries

2. Although there is modularity of shoulder implants with the option to preserve the humeral stem and convert to a reverse total shoulder replacement, a high riding humeral prosthesis in combination with scar tissue from prior surgeries does not permit enough lengthening of the arm for conversion to a reverse.  

3. Preservation of the humeral stem seems impossible in this case as it is necessary to displace the humeral head distally enough to accommodate an inferior placed glenosphere on the glenoid

4. Removal of a well fixed cemented humeral stem in the setting of osteopenia with thin bone cortices  is one of the most challenging problems in shoulder revision surgery. There is a high risk for fracture.

Taking into consideration those challenges and being prepared for those complications we elected to proceed with conversion to a reverse total shoulder replacement. The steps for a conversion to a reverse are outlined below:

1. Careful approach to the shoulder using the previous deltopectoral approach
2. Removal of the prosthetic humeral head from the stem
3. Prior multiple cultures showed no signs of infection, however multiple cultures were obtained again
4. Osteotomes were used on the proximal collar to "debond" the prosthesis and avoid fracture of the tuberosities during the removal of the stem. 
 5. A vertical humeral uni-cortical osteotomy was performed with an oscillating saw. With a set of osteotomes that are placed vertically in the osteotomy site - within the osteotomy - gentle twisting opened the humeral envelope and increased the diameter of the canal by a few millimeters. Gentle repetition of this twisting created a visible gap between the cement mantle and the prosthesis. It is important to avoid distal extension of the osteotomy pass the tip of the humeral prosthesis as this creates a stress riser. 


6. A bone impactor is placed on the collar of the prosthesis proximally and the stem was gently tapped which resulted in extraction of the prosthesis.
7. Cables were passed around the shaft of the humerus and a new press fit implant was selected by assessing the diameter of the cemented humeral canal with a straight reamer. A "tight fit" is enough for fixation as later closure of the osteotomy site with the cables will create a stable construct. Cement can be used at this stage if desired.

The remaining part of the case was a typical implantation of a reverse prosthesis. 

Postoperative xray is shown below:


6 weeks after surgery there is healing of the osteotomy and no dislocation


Saturday, November 5, 2016

Arthroscopic glenoid fracture fixation

Intra-articular fractures of the glenoid associated with fractures of the body of the scapula can be treated non operatively most of the time. Intra-articular glenoid step off and gapping of more than 5 mm may require operative fixation in selected patients. Fixation can be completed arthroscopically eliminating the need for excessive soft tissue surgical trauma. In the following video the technique for fixation of such fractures is demonstrated.


Monday, October 31, 2016

Chronic AC joint separation - Reconstruction using allograft and anatomic technique

Chronic AC joint separations are a challenging problem which requires non biologic and biologic fixation to avoid failure of the reconstructive surgery. Surgical treatment is offered to candidates who can be compliant with the restrictions in activity. Healing requires at least 3 months as tendon to bone healing is involved with this type of reconstruction. From the ACL reconstruction literature it is known that tendon to bone healing is completed at 6 months based on histology. For that reason, return to full activity is permitted at 6 months.

The biologic reconstruction is achieved by looping a tendon allograft (semitendinosus, or gracilis) around the base of the coracoid and fixing it through drill holes in the lateral clavicle. We avoid drilling of the coracoid because it creates a stress riser that may lead to coracoid fracture. The Augustus Mazzocca technique provides an anatomic fixation which mimics the anatomy of trapezoid an conoid ligaments. This technique is depicted below.

The non biologic reconstruction is achieved by looping a No 2 Fiberwire around the coracoid. This type of fixation may eventually fail but in the meantime the incorporation of the tendon graft in the bone tunnels will be complete and strong fixation may be achieved. There is a concern for fracture through the drill holes of the clavicle but it seems to be of low risk because the drill holes are filled with biotenodesis screws. Below are the images of such a reconstruction.
 Axillary view showing the posterior dislocation of the clavicle


AP view showing more than 100% displacement of the clavicle superiorly

 Restoration of the position of the clavicle relative to the acromion using the tendon allograft that was looped around the base of the coracoid (red line). The screws and tunnels are visible. 

Saturday, October 8, 2016

Failure of healing (nonunion) of spiral diaphyseal closed humerus fractures

A middle aged patient was treated in a conservative fashion for a closed long spiral humeral shaft fracture. There was no neurologic compromise. Although the Sarmiento application revealed satisfactory reduction, serial radiographs failed to show healing at 4 months followup.

We generally wait for 4 months and decide if healing occurs and we monitor:

1. Pain
2. Motion at the fracture side
3. X-rays of the fracture with Sarmiento brace on and with the brace off at 4 months. A key radiograph is an abducted view of the humerus with the Xray beam perpendicular to the plane of the scapula (similar inclination to the Grashey view). If motion at the fracture site is detected on X-ray then we start the workup for nonunion of the fracture.

In this case the 4 month followup X-rays did not reveal union, there was motion at the fracture site and for that reason operative fixation was decided with a long 4.5mm plate. We routinely avoid placement of two plates or more than 4 screws on each site of the fracture to avoid disturbance in the blood flow of the humeral bone.  If possible a lag screw is used to achieve compression. In this case cancellous bone graft with DBM was added to the construct.

Of particular importance is the protection of the radial nerve which crosses the posterior mid shaft area at 20cm proximal to the medial epicondyle and pierces the IM septum at approximately 10-14cm proximal to the lateral epicondyle. The plate needs to be visualized in its entirety to avoid plating of the nerve, and the placement of the lag screw(s) needs to be performed in way that does not endanger the radial nerve (posterior mid shaft area and spiral groove). Up to 20% radial nerve palsies have been reported with this type of surgery.

The case is illustrated below:
initial X-rays

initial X-rays 

Reduction with Sarmiento

Reduction with Sarmiento

4 months post injury

4 months post injury with Sarmiento brace off


4 months after surgery the fracture is healed as demonstrated by the X-rays below: